Download our mobile app

Our easy to use app is ad free and makes it simple to create a unique obituary and share it in a timely fashion.

Login

You may log in using your Facebook account.

You may create a unique log in by using email and password combination.

You may choose to continue as a guest. Go ahead look around.

Setting a PIN

After logging in via your preferred method, you will be prompted to create a PIN.

We all forget passwords and some prefer not to store them on their devices.

This makes getting back to MyObits very easy.

After confirming, you will move on to the next screen

Main Menu

On this screen, you are able to access all three functions of MyObits

CREATE AN OBIT: This is the main function of the application

GET NOTIFIED: Get obits delivered to your phone as they are posted

SEARCH: This allows you to search the MyObit’s database.

Create Obit

The first screen in “Create Obit” allows you to input the main information about the deceased.

First, Middle and Last Name (nicknames can be added on Middle name line with Parentheses (“Nickname”) around them alerting friends of the nickname.

Date of Birth is chosen with a drop-down field as is Date of Death.

Optionally, you may choose to upload a photo of the deceased.

Some families find uploading a photo on their MyObit helps with recognition and healing.

You can move to the next screen by choosing “NEXT

Service Information

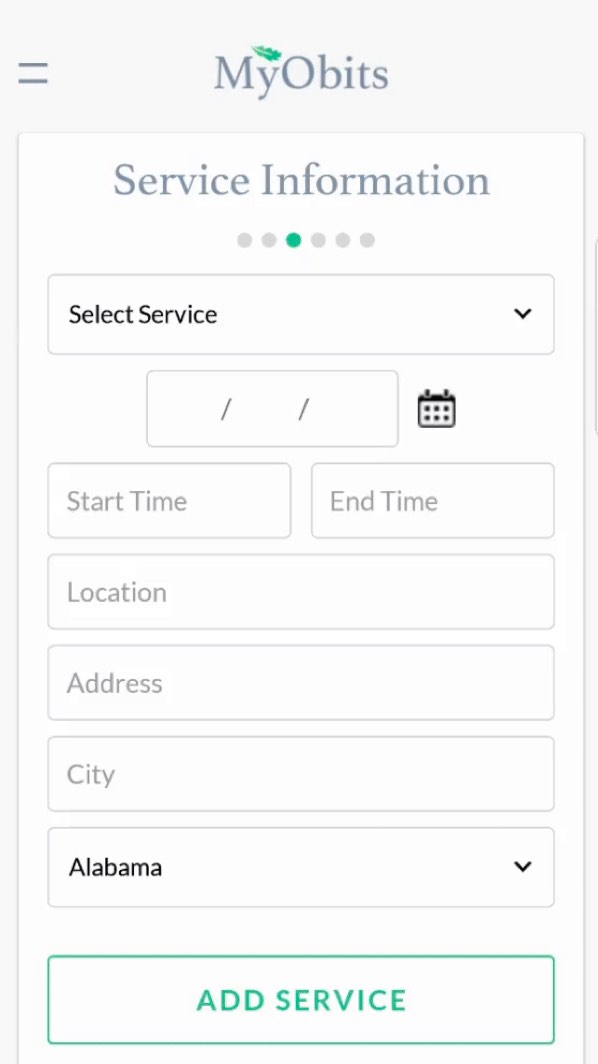
This screen will let friends and relatives know when and where services will be held.

You may enter as many services as you would like simply by repeating the “ADD SERVICE” process.

SELECT SERVICE: There are many service options in the drop-down menu or you may create your own.

DATE OF SERVICE: Choose from the drop-down menu

START TIME: Time the particular service in question will start

END TIME: Time you expect service in question will end. This helps friends and family prepare to support you.

LOCATION: Name of the facility where the service will be held (Church, Funeral Home, Residence, Park or any place you may want services held)

ADDRESS, CITY & STATE: This is important and will allow friends and family to access a mapping app to get directions to the service.

ADD SERVICE: After choosing this, you may continue to create more services or you may choose next to continue the creation process.

Additional Details

This screen will serve as the beginning of the deceased biography.

ENTER CITY OF DEATCH: this is where the deceased was “currently” living

STATE OF RESIDENCE: Drop down choice

DESCRIPTION: Not every family prefers the word “died”, MyObits has given the option of many of the most common terms or you may enter your own.

ENTER WHERE PASSED AWAY: This can be the town, state, country or even the facility.

CITY and STATE born: Enter the town and state in which the deceased was born.

Family

This screen allows you to enter as many surviving relatives as you’d like.

No longer are you limited to listing just immediate family members because of newspaper prices.

PARENTS

Choose ADD, enter Fathers name, city and state if still living

Continue by adding Mother’s name (include maiden name for the genealogical value).

This process can continue until you have entered everyone you would like to mention.

Biography

This is one of the most important sections in MyObits.

The information entered in this section will allow others to find the obituary.

If you enter a high school, college, military service, community organization, sorority, church, etc., MyObit users can search by those “keywords”.

So try to be accurate when spelling, so your obituary can reach those who want to be notified.

Be as detailed as you would like, remember, you are no longer being charged by the word or the column inch.

Let the world know what made your loved one so special!

Gifts

This screen gives you two options.

Offer a guest book for friends and family to leave messages of support or memories of the deceased.

Offer family and friends to order flowers, gifts, plant as a form of sympathy. If you choose this option, you will need to enter a delivery address (which will remain private).

Once you have completed this screen, it’s time to preview your obituary.